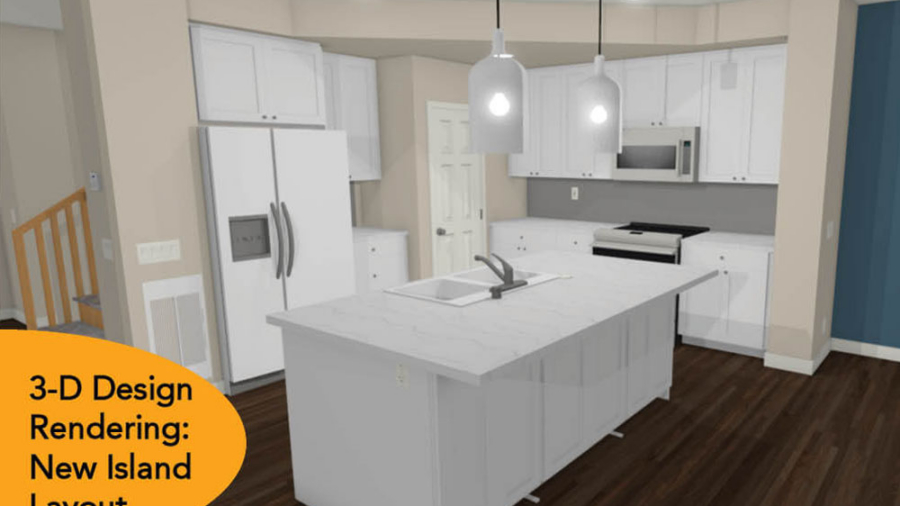
Design Inspiration: Elevate Your Bathroom with a Wet Room - Lenton Company

DESIGN INSPIRATION: Elevate Your Bathroom with a Wet Room

The concept of a wet room is transforming bathroom design, offering both practical and luxurious solutions for homeowners. Whether you seek to maximize a small space or create a spa-like retreat, a wet room can be a game-changer.

What Is a Wet Room? A wet room is a fully waterproofed bathroom where the shower area is integrated seamlessly with the rest of the space. Often, a tub is placed within the same open area, combining the bathing and showering experience. There are no barriers or traditional shower enclosures, creating a sleek, modern aesthetic.

Why Choose a Wet Room?

  • Space-Saving Solution: For compact bathrooms, a wet room can maximize every inch. Without the need for bulky shower enclosures, the space feels more open and functional.
  • Spa-Like Atmosphere: Combining a freestanding tub with a walk-in shower fosters a sense of relaxation and luxury. The open-concept design mimics high-end spa environments.
  • Accessibility: Wet rooms offer barrier-free entry, making them an excellent choice for aging in place or accommodating those with mobility concerns.
  • Easy Maintenance: With fewer fixtures and seamless surfaces, cleaning becomes more efficient.

Design Considerations:

  • Waterproofing Is Key: Proper tanking (waterproofing) is essential to prevent leaks and moisture damage. Engage professionals to ensure a watertight installation.
  • Smart Drainage: A gentle slope towards a linear or central drain allows water to flow efficiently without pooling.
  • Material Selection: Opt for slip-resistant tiles and durable surfaces that withstand constant moisture. Large-format tiles can minimize grout lines and enhance the clean aesthetic.
  • Glass Dividers: While wet rooms are often open, partial glass screens can help contain splashes without compromising the open feel.
  • Underfloor Heating: Combat the coolness of tile floors with underfloor heating, adding comfort and reducing drying time.
  • Ventilation: Adequate ventilation is vital to prevent mold and humidity buildup. Consider a high-quality extractor fan or windows for airflow.

Project Inspiration: For those seeking real-world examples, these stunning Lenton Company wet room designs showcase the versatility and elegance of the concept:

Is a Wet Room Right for You? While wet rooms offer style and practicality, they require careful planning. Highlighting the importance of expert installation to avoid water damage, designers are embracing the idea to create sleek and minimalist spaces. But first know your household’s needs; a wet room might not suit families with young children who prefer a contained bath area. However, for those seeking a contemporary upgrade, the benefits often outweigh the challenges.

Embrace the evolution of bathroom design and transform your daily routine with the beauty and functionality of a wet room.

Protect What Matters Most – New Fire Safety Innovations for Your Home - Lenton Company

Protect What Matters Most – New Fire Safety Innovations for Your Home

As wildfires become increasingly common and severe, homeowners in fire-prone areas must take proactive measures to safeguard their homes. Recent innovations and strategies provide new levels of protection, from ember-resistant vents to private fire hydrants. Here are key fire safety tips and developments, with insights from industry leaders and recent news sources.

Hardening Your Home

Take a close look at the vulnerable spots around your home and property where fire could take hold. Consider upgrading wood siding to a fire-resistant alternative and enclosing exposed wood eaves to reduce ignition risks. Inside, installing a sprinkler system can help contain fires quickly and may even lower your insurance premiums. Be sure to consult with your insurance provider to understand any additional fire safety measures they recommend.

Upgrade Your Vents to Prevent Ember Intrusion

One of the primary ways homes ignite during wildfires is through embers infiltrating attic and crawl space vents. Upgrading to ember-resistant vents can significantly reduce this risk. Companies like Vulcan Vents manufacture fire-resistant vents with an innovative honeycomb mesh and puffy coating that expands when exposed to heat, sealing off entry points and preventing embers from entering the home. Similarly, Brandguard Vents offer gable vents designed to block embers while allowing proper airflow, combining safety with ventilation efficiency.

Consider Installing a Private Fire Hydrant

Some Southern California homeowners are taking an additional step by installing private fire hydrants on their properties. This strategy can offer a critical water source in the event of a wildfire, especially when municipal water supplies are stretched thin. A recent Los Angeles Times article highlighted the growing trend among residents seeking to bolster their fire defenses after experiencing close calls with past wildfires. Similarly, a Yahoo Lifestyle piece showcased homeowners investing in private hydrants to protect their property and provide peace of mind. Always check with your local water district before purchasing to determine if any restrictions are in place. In addition, roof top sprinklers and a pool pump, if you have access to a swimming pool, are other innovative options.

Additional Home Fire Safety Recommendations

Beyond these innovations, consider these proven fire safety practices:

  • Clear vegetation and debris around your home to create defensible space.
  • Install fire-resistant roofing and siding materials.
  • Keep gutters clean and free of dry leaves.
  • Inspect fire extinguishers on a regular basis.
  • Have an emergency evacuation plan and keep essentials ready.
  • Stay informed about local fire conditions and alerts.

Next Steps

Combining traditional fire preparedness measures with modern solutions like ember-resistant vents and private fire hydrants can significantly enhance your home’s protection. As wildfires continue to challenge communities, staying proactive is key to ensuring the safety of your property and loved ones.

If you are interested in discussing any of the options available, we encourage you to call for a free Bob Jobs consultation. Bob Jobs is the newest division of Lenton Company focusing solely on ‘build’ projects and handyman tasks. Lenton Company has served the Antelope and Santa Clarita Valleys since 1984. For four decades and three generations, we have helped homeowners navigate the building and remodeling process. Call Lenton Company at 661.273.9179 to discuss or visit our website.

Recovering from a Wildfire: Steps for Recovery

Recovering from a Wildfire: Steps for Recovery

Wildfires leave behind destruction that can feel insurmountable. Rebuilding is possible, but not without enormous challenges. The process is detailed and often emotional, requiring attention to safety, documentation, and professional guidance. Here’s a guide to help you recover your home after a wildfire.

Immediate Steps for Home Recovery

1. Ensure Safety Before Entry:

  • Do not return to your property until local authorities confirm it is safe.
  • Be cautious of structural damage, unstable ground, and hazardous materials. Wear protective gear, such as masks, gloves, and sturdy boots.

2. Document the Damage:

  • Before starting any cleanup, thoroughly document the damage. Take clear, detailed photographs of all affected areas and items.
  • Create an inventory of damaged or lost belongings, noting their approximate value and condition.

3. File Insurance Claims:

  • Contact your insurance provider immediately to begin the claims process.
  • Provide the documentation you’ve gathered and keep copies of all correspondence and receipts. Temporary housing, cleanup costs, and repairs may be covered, so track these expenses carefully

Cleaning and Restoring Your Home

1. Remove Debris Safely:

  • Consult local authorities for debris removal guidelines. In some cases, specialized services may be required to handle hazardous materials.
  • Use caution when removing ash and charred materials. Always wear appropriate protective equipment to avoid inhaling harmful particles.

2. Ventilate and Decontaminate:

  • Open windows and doors to ventilate your home, allowing fresh air to circulate and help clear out smoke odors.
  • Use HEPA air filters to improve indoor air quality and eliminate lingering contaminants.
  • Clean all surfaces thoroughly with appropriate cleaning agents. Some materials, such as fabrics and insulation, may need to be replaced due to smoke damage.

3. Inspect and Repair Structural Damage:

  • Hire a licensed contractor or structural engineer to assess the integrity of your home’s foundation, walls, and roof.
  • Prioritize immediate repairs to prevent further damage, such as sealing leaks or reinforcing weakened structures.
  • For extensive damage, work with professionals to create a comprehensive rebuilding plan.

4. Test and Replace Systems:

  • Check your home’s electrical, plumbing, and HVAC systems for damage. Fire and heat can compromise these systems even if they appear intact.
  • Replace damaged wiring, pipes, and equipment as needed to ensure safety and functionality.

Financial and Emotional Support

1. Access Disaster Assistance:

  • Contact local and federal disaster relief programs for financial assistance with rebuilding and repairs. Organizations such as FEMA and the Red Cross can provide aid and resources.

2. Lean on Your Community:

  • Recovery is not a journey you need to face alone. Reach out to neighbors, friends, and support groups to share resources and experiences.
  • Counseling services can help you and your family cope with the emotional toll of the disaster.

Long-Term Considerations for Rebuilding

1. Use Fire-Resistant Materials:

  • When rebuilding or repairing, choose materials designed to withstand fire, such as metal roofing, tempered glass, and concrete siding.
  • Upgrade windows, doors, and vents to meet modern fire-resistant standards.

2. Create Defensible Space:

  • Clear vegetation and debris within 30-100 feet of your home to reduce future fire risks.
  • Incorporate fire-resistant landscaping features, such as gravel paths and stone walls.

3. Work with Professionals:

  • Partner with experienced contractors and architects who specialize in post-disaster rebuilding. They can help ensure your home meets current safety and building codes.

Moving Forward

Rebuilding your home after a wildfire is a journey that requires determination, careful planning, and a supportive network. Each step forward not only restores the physical structure of your house but also brings you closer to reclaiming the comfort and security of a family home. Recovery takes time, but every effort helps rebuild the sense of normalcy and belonging that defines a true home.

Lenton Company has served the Antelope and Santa Clarita Valleys since 1984. For four decades and three generations, we have helped homeowners navigate the building and remodeling process. Call Lenton Company at 661.273.9179 to discuss or be inspired browsing the portfolio on our website.  

Your Guide to a Successful Whole House Remodel: Tips for Homeowners - Lenton Company

Your Guide to a Successful Whole House Remodel: Tips for Homeowners

Embarking on a whole house remodel is an exciting journey, but it can also feel overwhelming without the right plan in place. Whether you’re updating an older home or customizing a space to fit your lifestyle, following a clear strategy can make the process smoother and more enjoyable. Here are the best ways to ensure your remodel is a success:

1. Define Your Vision

Before diving in, take time to think about what you want to achieve. Do you need more space, better functionality, or a specific aesthetic? A great place to start is on Houzz, an online community that allows users to connect with home improvement professionals, find inspiration, and learn about home design and renovation. Houzz Pro Tip: Check out Lenton Company’s portfolio on Houzz and create an idea book!

2. Set a Realistic Budget

Whole house remodels can vary widely in cost, so it’s essential to establish a budget early. Account for construction, materials, and labor costs, and include a contingency fund for unexpected expenses. Communicate your budget clearly with your contractor to ensure designs align with your financial expectations.

3. Hire the Right Team

Choosing an experienced and trustworthy design-build team is critical. Look for professionals who specialize in whole house remodels and have a portfolio that aligns with your style. Read reviews, check references, and ensure they are licensed and insured. A skilled team will guide you through every step, from design to construction.

4. Plan for the Disruption

A whole house remodel can disrupt your daily life, so it’s important to prepare. Decide whether you’ll stay in the home during construction or relocate temporarily. Create a plan for accessing essentials like the kitchen or bathroom, and communicate with your contractor to establish clear timelines and minimize surprises.

5. Focus on Functionality

While aesthetics play a key role in any remodel, functionality should always be the foundation of your design choices. Think about how you use each space daily and identify improvements that could simplify and enhance your routines. For instance, in the kitchen, a large island can provide extra prep space while also serving as a casual seating area, or you might prioritize creating a seamless connection between indoor and outdoor areas for entertaining. In living areas, opting for an open floor plan can make your home feel more spacious and welcoming. Bathrooms offer the perfect opportunity to add luxurious touches like heated floors, walk-in/roll-in showers, or smart fixtures, all of which combine practicality with comfort. By focusing on how each space works for you, your remodel will be both beautiful and highly functional.

6. Embrace Timeless Design

Trends come and go, but a whole house remodel is a long-term investment. Opt for timeless finishes and materials that will look great for years to come. You can always incorporate bold colors or patterns in easily changeable elements like paint, wallpaper, or décor.

7. Embrace Timeless Design

Trends come and go, but a whole house remodel is a long-term investment. Opt for timeless finishes and materials that will look great for years to come. You can always incorporate bold colors or patterns in easily changeable elements like paint, wallpaper, or décor.

8. Stay Flexible

Even with the best planning, unexpected challenges can arise during a remodel. Be prepared to make adjustments and trust your contractor’s expertise to find the best solutions. Staying flexible and positive will help keep the project on track.

9. Think About the Long Term

A whole house remodel is an opportunity to future-proof your home. Consider adding features that will grow with you, such as universal design elements for aging in place, energy-efficient systems, or smart home technology.

10. Think About the Long Term

Remodeling your home is a significant milestone, so take time to enjoy the journey. Document the progress with photos, celebrate each phase, and look forward to the day you step into your beautifully transformed space.

Ready to transform your living spaces?

A whole house remodel is a chance to create a home that truly reflects your personality and needs. With careful planning, a skilled team, and a focus on both design and functionality, the process can be as rewarding as the result. Ready to get started? Reach out to us to begin your dream remodel today!

Don’t know where to start? Contact Lenton Company today for a consultation and start your journey towards a more beautiful home that brings your vision to life. Call Lenton Company at 661.273.9179 to discuss or be inspired browsing the portfolio on our website.

Remodeling Trends: Bright Colors and Bold Textures - Lenton Company

Remodeling Trends: Bright Colors and Bold Textures

In the world of home remodeling, a few key trends are shaping the way homeowners are reimagining their spaces, particularly in primary bedrooms and bathrooms. There’s been a noticeable shift away from neutral palettes and minimalist textures, with more people embracing vibrant colors and bold patterns to give their rooms a more personal touch.

In a recent project, we brought these trends to life in a stunning primary bathroom and bedroom transformation. The homeowner chose rich purples and deep tones that added warmth and character. Bold design choices, like textured accent walls and statement lighting, introduced visual depth, showing how modern spaces can combine both aesthetics and functionality.

Here are a few ways these trends were incorporated:

1. Bright and Bold Colors

Neutral tones are no longer the go-to. In this remodel, the bold purple walls created an eye-catching contrast against the neutral stone tile and sleek fixtures, proving how a pop of color can anchor a design.

2. Textured Surfaces

Layering textures continues to be a popular trend, from intricate mosaic wall accents to textured glass doors. These details add dimension and bring a sense of depth to the space, making it feel luxurious and thoughtfully designed.

3. Statement Fixtures

Freestanding tubs and glass-enclosed showers are staples of modern bathroom design, but the stained-glass door in this project stole the show. This artistic detail added a personal and creative touch, making the space feel one-of-a-kind.

4. Luxury and Comfort

A well-designed space should also offer comfort. Heated floors were a key feature in this remodel, enhancing the comfort of the bathroom and creating a retreat-like feel. When paired with bold colors and textures, the result was a striking yet inviting atmosphere.

Ready to transform your living spaces?

If you’re considering a remodel, don’t hesitate to embrace bolder design choices. Whether it’s through bright colors or daring textures, these trends are a great way to bring personality and sophistication into your home. Bold design can transform even the most functional spaces into something memorable and stylish.

Stay tuned for more remodeling ideas and tips on how to incorporate these trends into your next project! With careful planning and professional execution, a primary bathroom makeover can enhance your life for years to come and increase market value when you’re ready to move on.

Don’t know where to start? Contact Lenton Company today for a consultation and start your journey towards a more beautiful home that brings your vision to life. Call Lenton Company at 661.273.9179 to discuss or be inspired browsing the portfolio on our website.  

Trending Home Renovation: Converting Wet Bars into Stylish Wine or Coffee Bars - Lenton Company

Trending Home Renovation: Converting Wet Bars into Stylish Wine or Coffee Bars

As more homeowners seek to maximize space and tailor their homes to fit their personal lifestyles, a popular renovation trend is the transformation of outdated wet bars into sleek, functional wine (or coffee) bars. This trend, as seen in one of our recent Acton kitchen remodels, is ideal for those who want to elevate their entertainment spaces while incorporating a modern, cohesive design.

Why Convert a Wet Bar?

The traditional wet bar, once a popular feature in homes, has fallen out of favor due to its bulky, often underused sink and cabinetry. In today’s homes, people are prioritizing functionality and aesthetics, making wine bars a more appealing choice. A wine bar offers dedicated storage for bottles, glassware, and accessories, making it easier to entertain and enjoy a curated collection of wines.

Key Design Elements for a Wine Bar Conversion

1. Integrated Cabinetry

One of the key components of transforming a wet bar into a wine bar is seamless integration with the kitchen or surrounding space. Custom cabinetry can match the rest of your kitchen design, creating a smooth flow. In our recent Acton project, we designed the wine bar to complement the kitchen cabinetry for a cohesive, modern look.

2. Wine Storage Solutions

A dedicated wine bar offers specialized storage, whether it’s custom wine racks, temperature-controlled wine coolers, or open shelving to display glassware and accessories. This allows homeowners to showcase their collection while ensuring bottles are stored properly.

3. Functional Lighting

Lighting plays a crucial role in highlighting the wine bar’s features. Consider under-cabinet lighting to illuminate the space and create an inviting ambiance. Task lighting also ensures the area is practical for serving drinks.

4. Personal Touches

A wine bar should reflect the homeowner’s personal style. From selecting materials like stone countertops to incorporating personal mementos or wine-related décor, small touches can make the space uniquely yours.

The Benefits of a Wine Bar

In addition to adding style and sophistication, a wine bar boosts a home’s functionality. It offers a dedicated space for entertaining, reduces clutter in the kitchen, and adds value to the home. It’s a great way to enhance both the design and usability of any living space.

Incorporating a wine bar into a home remodel is a simple yet impactful way to modernize your home while making it more enjoyable for everyday living and entertaining. Whether you’re an avid wine enthusiast or just looking for a chic space to store beverages and entertain, this trend is a perfect way to add value and style to your home.

With careful planning and professional execution, a family room makeover complete with a wine bar addition can enhance your life for years to come.

Ready to transform your home? Don’t know where to start? Contact Lenton Company today for a consultation and start your journey towards a safer, more comfortable home. Call Lenton Company at 661.273.9179 to discuss or be inspired browsing the portfolio on our website.

ward-Winning Accessible Primary Suite in Palmdale - Lenton Company

Embracing Change: Accessible Bathroom Remodeling for Living in Place

As we age, our needs and abilities change, making it essential to adapt our living spaces for safety, comfort, and accessibility. One of the most critical areas to address is the bathroom, where slips and falls are common. Remodeling a bathroom for accessibility ensures that individuals can maintain their independence and age in place gracefully. Here’s a comprehensive guide to creating an accessible bathroom that meets changing needs.

Assessing Current and Future Needs

Aging in place refers to the ability to live in one’s own home and community safely, independently, and comfortably, regardless of age or ability level. As mobility decreases with age, the bathroom can pose significant risks. Slippery floors, high bathtubs, and limited maneuvering space can lead to accidents. Remodeling your bathroom with accessibility in mind can prevent these hazards and enhance the quality of life.

Key Features of an Accessible Bathroom

1. Wider Doorways and Clear Pathways

Ensure the bathroom door is wide enough to accommodate a wheelchair or walker. A minimum width of 32 inches is recommended. Clear pathways free of obstacles are crucial for easy navigation.

2. Non-Slip Flooring

Choose non-slip tiles or add non-slip mats to prevent falls. Textured flooring materials provide better grip, even when wet.

3. Barrier-Free Showers

Traditional bathtubs can be challenging to access. Walk-in showers or roll-in showers with a barrier-free entrance provide safer and easier access. Consider installing a built-in shower bench for added convenience.

4. Grab Bars and Handrails

Strategically placed grab bars and handrails around the toilet and shower areas provide support and stability. Ensure they are securely installed to bear weight.

5. Comfort-Height Toilets

Install a comfort-height toilet, which is higher than standard models, making it easier for individuals with mobility issues to sit and stand. Consider adding a smart bidet seat for enhanced hygiene and convenience.

6. Accessible Vanity and Sink

Opt for a vanity with knee space underneath to accommodate wheelchair users. Ensure that sink fixtures are easy to reach and operate.

7. Adequate Lighting

Good lighting is essential for visibility and safety. Incorporate both ambient and task lighting. Motion-sensor lights can provide additional convenience.

8. Smart Bathroom Technology

Innovations like touchless faucets, voice-activated lights, and smart bidet toilets can enhance convenience and independence. These technologies can be particularly beneficial for those with limited dexterity or cognitive impairments.

9. Thermal Comfort

Heated floors and towel warmers can add comfort, especially for those with circulation issues. Ensure the heating elements are safely installed and controlled.

Design Considerations

While functionality is paramount, it’s possible to create an accessible bathroom that is also aesthetically pleasing. Here are some design tips:

Blending Styles: Mix modern and traditional elements to achieve a look that suits your taste. For example, use sleek fixtures alongside classic tile designs.

Color Scheme: Choose a color scheme that enhances visibility. Contrasting colors can help differentiate areas and improve navigation.

Materials: Select durable, easy-to-clean materials that require minimal maintenance.

Remodeling a bathroom for accessibility is a proactive step towards aging in place safely and comfortably. By focusing on key features such as barrier-free showers, non-slip flooring, grab bars, and accessible vanities, you can create a space that meets changing needs without compromising on style. With careful planning and professional execution, an accessible bathroom can enhance independence and quality of life for years to come.

Ready to transform your bathroom into an accessible oasis? Don’t know where to start? Contact Lenton Company today for a consultation and start your journey towards a safer, more comfortable home. Call Lenton Company at 661.273.9179 to discuss or be inspired browsing the portfolio on our website.  

Lenton Company 12-Step Process: Transforming Spaces, One Step at a Time - Lenton Company

Lenton Company 12-Step Process: Transforming Spaces, One Step at a Time

When embarking on a remodeling journey, having a structured plan is essential for success. Lenton Company, with its extensive experience and customer-centric approach, offers a comprehensive 12-step process that ensures every project is executed flawlessly. Here’s an in-depth look at our method, designed to transform your living spaces seamlessly and beautifully.

1. Search

Finding Lenton Company: the process begins when you first reach out to Lenton Company, whether through social media, an internet search, website or phone call, a referral, or as a past client.

2. Initial Contact

This initial step is about gathering basic information about you and your project. The team provides a brief overview of the process and evaluates if your project is a good fit, considering the project type and estimated budget.

3. Gathering Information through Discovery

This phase delves deeper into understanding who you are, what you want from the remodel, why you want to undertake this project, and how much you’re willing to invest. The team takes pictures or scans your space to better visualize the transformation. This step ensures both parties are aligned before moving forward.

4. Homework Assignments

You’re given a series of tasks to help clarify your vision and preferences. These include exploring Lenton Company’s website, reading reviews, following us on social media, and visiting Houzz to create an idea book. This homework helps you dream and envision your new spaces more vividly. Our homework is to share photos and notes with the team while preparing budget ranges.

5. Decision Time

Here is where we showcase similar past projects while reviewing discovery photos, ideas, and budget ranges. If you think we’re a good fit, we sign a Design-Build Agreement. This does not obligate you to the project, but allows us to work with you on bringing your vision to life through design.

6. Meeting the Designer and Preliminaries

In this step, you meet with your designer who measures your space, reviews your inspirations, and discusses the budget range. This meeting sets the stage for the creative design process.

7. Design is Where the Magic Begins

The first design iteration is presented in 3D, giving you a tangible sense of the proposed changes. Your feedback is crucial at this stage to refine and perfect the designs.

8. Pricing & Plans

The designs are updated based on your feedback. Plans are prepared, and the budget range is confirmed and updated. A job walk at your place with the team may be considered to ensure everything is on track.

9. Updated Design and Material Selections

Here’s where you dive into selecting fixtures, finishes, materials, and more, seeing these choices in 3D modeling. This is always everyone’s favorite part where your space starts to take shape with more detail and personalization.

10. Pre-Build and Construction Preparations

The price is updated based on your selections, and a construction contract is signed. The permit application is submitted, and the project is handed off from the design team to the build team. A pre-construction site meeting is conducted, materials are ordered, and preparations for demolition begin.

11. The Build

The actual transformation starts with demolition, followed by the remodeling phase. Throughout this process, you can follow the progress on BuilderTrend, ensuring transparency and communication. Upon substantial completion, final inspections are conducted, and you can move back into your newly remodeled space. This step marks the end of the construction phase and the beginning of enjoying your transformed home.

12. Post Completion Follow-up

Warranty and lien release documents are provided, and follow-ups are conducted to ensure everything meets your expectations. Reviews are welcomed as they help Lenton Company improve and showcase our work.

Next Steps: Enjoy and Share

With your new space ready, it’s time to enjoy it. Lenton Company encourages you to tell your friends about your experience and consider them for any future projects or smaller “Bob Jobs.”

Lenton Company’s 12-step design process is a testament to our commitment to excellence and customer satisfaction. By guiding clients through a detailed and organized roadmap, we ensure every project is a success. Whether you’re dreaming of a new kitchen or bathroom, an expanded living area, an outdoor oasis, or a complete home makeover, Lenton Company has the expertise and the process to bring your vision to life. Don’t know where to start? Call Lenton Company to discuss or be inspired browsing the portfolio on our website.

Creating a Focal Point in Your Kitchen Remodel - Lenton Company

Case Study: Creating a Focal Point in Your Kitchen Remodel

Every homeowner dreams of crafting a perfect living space, where style and functionality blend seamlessly. For one family, the journey to transform their forever home’s outdated, dark kitchen into a bright, inviting hub was driven by a desire to create a unique focal point that made the space truly their own. Join us as we explore the challenges they faced, the innovative design solutions they implemented, and the stunning final outcome that surpassed all expectations. If you’re looking for inspiration for your own project, whether you need a kitchen remodeling contractor in Lancaster, Palmdale, or Santa Clarita, read on to discover how creating a focal point can transform your kitchen.

The Challenge: Breaking Free from the Past

The kitchen, often considered the heart of the home, was anything but heartwarming in this forever home. The space felt closed off and cramped due to a peninsula and hanging cabinets that obstructed both movement and light. The poor lighting conditions made the kitchen feel gloomy, and a drop ceiling and wall between the kitchen and living room further contributed to the dated look and disrupted the ceiling’s flow throughout the house.

The homeowners envisioned a kitchen that was open, bright, and welcoming, with a unique focal point to make the space their own. The challenge was clear: to transform this confined space into a functional and beautiful kitchen that would serve as a centerpiece for the home.

The Design: Crafting a Vision

The design phase was all about reimagining the space with a distinctive focal point. The first step was to remove the drop ceiling, allowing the ceiling height to be consistent throughout the home. This change immediately created a sense of openness and continuity. To accommodate a new island and improve the kitchen’s flow, four feet of the wall dividing the living room and kitchen was removed, enhancing the connectivity between these two essential spaces.

The kitchen’s aesthetic transformation began with a modern, two-tone palette: pebble grey cabinets paired with a striking slate island. Ready-to-assemble cabinets were selected for their blend of affordability and quality. Quartz countertops with subtle warm veins provided a durable and elegant surface, while a classic subway tile backsplash added timeless charm. The homeowners added a personal touch and created a unique focal point with a beach scenery accent piece behind the stove, reflecting their love for the coast.

A popular trend is using mixed metals. Finishing touches included champagne bronze cabinet hardware, which added a sophisticated flair, and stainless steel finishes for appliances, the sink, and the faucet. The microwave was relocated to free up counter space, new recessed lighting was installed to brighten the room effectively, and a new pantry was added to increase storage capacity.

The Build: Bringing the Vision to Life

The build phase was where the vision began to materialize. Demolition of the drop ceiling and partial wall was the first step, crucial for opening up the kitchen. Structural adjustments were handled meticulously to ensure the home’s integrity while creating the desired open space. The ready-to-assemble cabinets and two-tone design were installed, transforming the kitchen’s look and feel.

Quartz countertops were expertly installed, offering a beautiful and resilient work surface. The subway tile backsplash, combined with the personalized beach accent piece, created a stunning focal point that added both classic and unique elements to the kitchen. The champagne bronze hardware was installed with precision, enhancing the overall design.

Stainless steel appliances, a new sink, and a faucet were integrated seamlessly into the kitchen. Relocating the microwave created additional counter space, and the strategically placed recessed lighting eliminated dark spots, ensuring a well-lit environment perfect for both cooking and entertaining.

The addition of the island was a game-changer, providing much-needed additional storage and seating. This new feature became a central hub for daily activities and family gatherings, perfectly aligning with the homeowners’ vision for their dream kitchen.

The Outcome: A Dream Realized

The remodeled kitchen exceeded the homeowners’ expectations, transforming their forever home into a bright, open, and inviting space. The removal of the drop ceiling and partial wall created a seamless flow between the kitchen and living room, enhancing the home’s overall functionality and aesthetic appeal.

The two-tone cabinetry, quartz countertops, and subway backsplash combined to deliver a modern yet timeless look, while the personalized beach accent piece created a unique and cherished focal point. Functional improvements, including additional storage, better lighting, and the introduction of the island, significantly enhanced the kitchen’s usability.

This stunning kitchen remodel not only met but surpassed the homeowners’ needs, providing a beautiful and practical space perfect for everyday living and special family gatherings. It’s a true testament to the transformative power of thoughtful design and skilled craftsmanship.

We Can Do This For You Too: Inspiring Your Own Transformation

Whether you’re considering a major remodel or looking for inspiration to update your space, this case study showcases how creating a focal point in your kitchen can dramatically improve both the look and functionality of your home. By addressing challenges head-on, embracing innovative design solutions, and focusing on quality craftsmanship, you too can create a space that truly feels like the heart of your home.

If you’re searching for a kitchen remodeling contractor in Lancaster, a kitchen remodeler in Santa Clarita, or a kitchen design center in Palmdale, let this inspiring remodel be your guide to unlocking the full potential of your kitchen. With the right professionals and a clear vision, your dream kitchen is just a remodel away.

Don’t know where to start? Call Lenton Company to discuss or be inspired browsing the portfolio on our website.

How to Remodel Your Bathroom for Accessibility - Lenton Company

How to Remodel Your Bathroom for Accessibility

As homeowners, we invest significant time and effort into making our houses feel like home. Yet, as we age, our needs evolve, and our homes must adapt to ensure comfort, safety, and accessibility. One crucial area often overlooked in this process is the bathroom. Fortunately, with thoughtful remodeling, you can transform your bathroom into a space that not only meets your current needs but also supports you as you age in place. Explore essential tips and considerations for remodeling your bathroom for accessibility, allowing you to live in your home well for years to come.

1. Prioritize Safety

Safety should be the primary consideration when remodeling a bathroom for accessibility. Start by ensuring there are no tripping hazards, such as loose rugs or cluttered spaces. Replace traditional bathtubs with barrier-free showers equipped with grab bars for added support. Installing non-slip flooring, such as textured tiles, can also minimize the risk of slips and falls, especially in wet conditions.

2. Optimize Space

A spacious layout is essential for maneuverability, especially if mobility aids like wheelchairs or an assistant may be needed in the future. Consider widening doorways and removing unnecessary obstacles to create a more open and accessible environment. Additionally, choose fixtures and fittings that maximize floor space while still meeting your needs.

3. Invest in Accessible Fixtures

Selecting fixtures designed specifically for accessibility can significantly enhance your bathroom’s functionality. Look for features such as adjustable showerheads, handheld sprays, and lever-handled faucets, which are easier to operate for individuals with limited dexterity. Installing a comfort-height toilet can also make bathroom activities more comfortable and convenient.

4. Incorporate Universal Design Principles

Universal design principles aim to create spaces that are usable by people of all ages and abilities. Embrace these principles by incorporating features like curbless showers, which eliminate barriers to entry. By embracing universal design, you can future-proof your bathroom and ensure it remains functional and inclusive for years to come.

5. Enhance Lighting and Visibility

Good lighting is crucial for safety and visibility, especially for older adults with declining eyesight. Install bright, energy-efficient lighting fixtures to illuminate the entire bathroom, including task-specific lighting near the vanity and shower areas. Consider incorporating motion-activated lights or illuminated switches for added convenience, particularly during nighttime visits to the bathroom.

6. Focus on Comfort and Style

While prioritizing accessibility and safety, don’t overlook the importance of comfort and style. Choose design elements and finishes that reflect your personal taste while still meeting practical needs. Incorporate features like heated floors, comfortable seating, and stylish accessories to create a bathroom that feels both inviting and functional.

Overall, remodeling your bathroom for accessibility is an investment in your future well-being and independence. By prioritizing safety, optimizing space, and embracing universal design principles, you can create a space that allows you to live in your home well as you age. With thoughtful design, your accessible bathroom can seamlessly blend functionality, comfort, and style, ensuring you can continue to enjoy your home for years to come. Don’t know where to start? Call Lenton Company to discuss or explore our award-winning accessibility projects on our website.